
반응형
Notice
Recent Posts
Recent Comments
Link
| 일 | 월 | 화 | 수 | 목 | 금 | 토 |
|---|---|---|---|---|---|---|
| 1 | 2 | 3 | 4 | 5 | 6 | |
| 7 | 8 | 9 | 10 | 11 | 12 | 13 |
| 14 | 15 | 16 | 17 | 18 | 19 | 20 |
| 21 | 22 | 23 | 24 | 25 | 26 | 27 |
| 28 | 29 | 30 |
Tags
- 네트워크
- 리눅스
- mongo
- next.js
- mongoose
- CS
- 생각일기
- 피드백
- 주간회고
- 자바스크립트
- js
- 코테
- 기록
- 알고리즘
- Grafana
- Git
- 회고
- array
- typescript
- Java
- react
- WIL
- 생각로그
- nest.js
- mysql
- til
- javascript
- MongoDB
- 생각정리
- 트러블슈팅
Archives
- Today
- Total
코딩일상
[nest.js] middleware 적용 본문
반응형

미들웨어
미들웨어는 라우트 핸들러 보다 먼저 호출되는 함수입니다 . 미들웨어 기능은 애플리케이션의 요청-응답 주기에서 요청 및 응답 객체 와 미들웨어 기능에 액세스할 수 있습니다 . next()다음 미들웨어 기능은 일반적으로 라는 변수로 표시 됩니다next .
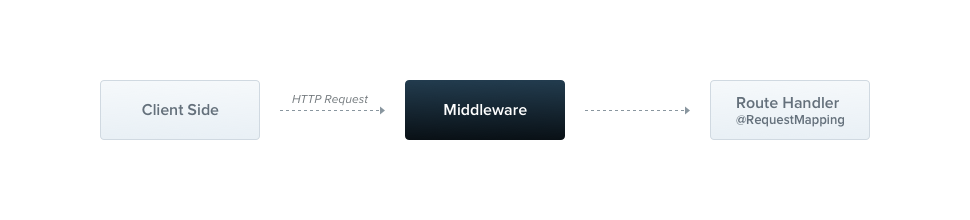
Nest 미들웨어는 기본적으로 express 미들웨어와 동일합니다. 공식 익스프레스 문서의 다음 설명은 미들웨어의 기능을 설명합니다.
로깅파일만들기 CLI 명령어 이용
$ nest g middleware logger
1)Documentation그대로 logging을 할 경우
import { Injectable, NestMiddleware } from '@nestjs/common';
import { NextFunction, Request, Response } from 'express';

@Injectable()
export class LoggerMiddleware implements NestMiddleware {
  use(req: Request, res: Response, next: NextFunction) {
    console.log(req.ip);
    next();
  }
}
요청을 받았을때 logging 결과값은 아래와 같다.

2)nest js Logger Class를 이용하여 logging을 할 경우
import { Injectable, Logger, NestMiddleware } from '@nestjs/common';
import { NextFunction, Request, Response } from 'express';

@Injectable()
export class LoggerMiddleware implements NestMiddleware {
  //nestjs의 logger클래스를 이용하여 logging 진행
  private logger = new Logger('HTTP');
  use(req: Request, res: Response, next: NextFunction) {
    this.logger.log(`${req.ip},${req.method}, ${req.originalUrl}`);
    next();
  }
}

3)nest js Logger Class를 이용하여 logging을 할 경우 +RES값에 대해서도 볼 경우
import { Injectable, Logger, NestMiddleware } from '@nestjs/common';
import { NextFunction, Request, Response } from 'express';

//nestjs의 logger클래스를 이용하여 logging 진행
//res응답할때 까지 의 값도 같이 logging 할 경우
@Injectable()
export class LoggerMiddleware implements NestMiddleware {
  private logger = new Logger('HTTP');

  use(req: Request, res: Response, next: NextFunction) {
    res.on('finish', () => {
      this.logger.log(
        `${req.ip},${req.method},${res.statusCode}`,
        req.originalUrl,
      );
    });
    next();
  }
}

참고 레퍼런스
Documentation | NestJS - A progressive Node.js framework
Nest is a framework for building efficient, scalable Node.js server-side applications. It uses progressive JavaScript, is built with TypeScript and combines elements of OOP (Object Oriented Progamming), FP (Functional Programming), and FRP (Functional Reac
docs.nestjs.com
반응형
'개발 공부 > nest.js' 카테고리의 다른 글
| [nest.js] Pipes란?? Pipes 예제 (0) | 2022.12.05 |
|---|---|
| [nest.js] 예외 처리, 예외 필터를 만들어 보자 (0) | 2022.12.05 |
| [nest.js] CLI 이용하여 파일 및 폴더 생성방법 (0) | 2022.12.05 |
| [nest.js] nest.js 규칙 관련 기본 플러그인들 설명 (1) | 2022.12.03 |
| [nest.js] nest.js 첫 시작(first step) (0) | 2022.12.02 |
'개발 공부/nest.js' Related Articles
more


Comments